Table of Contents Show
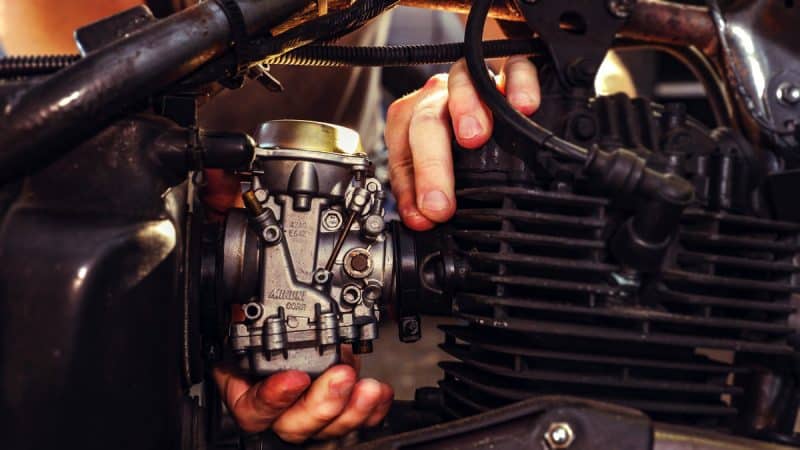
Cleaning the carburetor is a part of the process of owning a carbureted motorcycle. To keep the motorcycle running properly, a holistic cleaning and maintenance routine of the carburetor and overall motorcycle is a must.
But it’s a big hassle to remove and clean the carburetor from the motorcycle. So how should you clean the motorcycle’s carburetor without removing it? Cleaning the carburetor without removing it from the motorcycle can be done using a compressed-air gun, carb cleaner spray, seafoam, or liquimoly 4t additive. These will help you get rid of the carbon deposits, fuel residue, grease, and gunk formed inside the jets and passageways of the carburetor.
In this article, we will talk about various ways to clean the motorcycle carburetor without disassembling or removing it. There are easy steps you can follow.
You will also need the right products to clean the carburetor effectively. But you don’t have to worry about it because we will guide you through this cleaning process.
How To Clean Motorcycle Carburetor Without Removing It
Cleaning can be done using multiple methods such as using a compressed air gun or using the trusted crab cleaner spray. You can also try engine cleaning/flush products by adding them to your fuel tank.
As you know, petrol contains 10% ethanol which does not age well and leaves some residue inside which can clog the jet and passageways of the carburetor.
Motoxtasy Pro Tip: Always fill petrol/gas with high octane levels. The octane level should not be less than 91. High octane fuel helps the fuel/gas burn more efficiently and doesn’t leave any carbon residue resulting in good idling, proper acceleration, and good mileage.
Here is a step-by-step method of cleaning the carburetor with a carb cleaner and a compressed air gun.
Step 1. Make Sure That The Fuel Tap/Petcock Is Closed/Off
In old motorcycles, OEM ( Original Equipment Manufacturer ) used to provide a manual tap to control the fueling of the motorcycle.
It is generally located below the fuel tank and above the engine.
Modern motorcycles have automatic taps which will turn off the fueling once the ignition is switched off.
Turning the tap off will ensure that the fuel from the fuel tank will not flow toward the carburetor.
Step 2. Drain The Carburetor Completely
There is a mixture screw ( drain screw ) on the bottom side of the carburetor.
Underneath it, there is a drain pipe. Remove the other end
of the drainpipe of the carburetor and loosen the mixture screw.
Make sure you count how many rotations it takes to unscrew.
The mixture screw controls the rich and lean mixture of the fuel and air.
Once you have loosened the screw to its max, the fuel from the carburetor will start to drip.
Step 3. Cleaning The Inside & Out Of The Carburetor
First, use the carburetor cleaner spray ( WD-40 Specialist® Carb/Throttle Body & Parts Cleaner) on the exterior of the carburetor, so there are no pollutants on it.
Once you are done spraying the carburetor cleaner spray on the carburetor. You have to detach the air filter hose pipe, which is attached with a ring and a screw.
Now spray the carburetor cleaner inside the air inlets ( Slow speed circuit, main circuit, float bowl vent ) with a generous amount.
You can always refer to the user’s manual to locate the air inlets of your carburetor. And also spray the carb cleaner in the passage where the air filter hose pipe connects.
The carb cleaner will go through all the passages and jets to free up the gunk ( carbon deposits ) which is settled in there.
Now spray compressed air in the carburetor air inlets by inserting the nozzle of the can or whatever device you are using.
The compressed air will further free up any leftover carbon deposits or grease and get rid of it.
Step 4. Now Tighten the Mixture Screw Back Into The Carburetor
Once you have noted how many rotations the mixture screw needs before completely unscrewing it.
Rotate the mixture screw back in with the same amount of rotations.
Just in case you forgot to number, play with the mixture screw a little while keeping the engine on listening closely to the exhaust, and tighten the screw accordingly.
If the engine rpm is more, then the mileage will be less. And if the rpm is less, then the mileage will be more.
In this scenario, mileage and speed are inversely proportional. So adjust accordingly.
Now Step By Step Alternative Method Of Cleaning Carburetor With Fuel System Cleaners ( Seafoam Or Liquimoly 4T Shooter Additives )
Step 1. Add The Seafoam Or liquimoly 4T Additive
Add the Seafoam or liquimoly 4T additive to your fuel tank. The ratio for seafoam motor treatment is 60-milliliter per 3.7 to 4 liters of fuel, and for liquidity 4T Shooter is 6-milliliter per 1-liter of fuel. ( Use google Conversion according to the country’s measuring unit )
Step 2. Mixing The Liquid Additive
Once you have added it to your fuel tank, make sure it mixes with petrol and settles completely.
Step 3. Shake For Extra Measure
Shake your motorcycle/bike for extra measures to ensure that it mixes with the petrol/gas.
Step 4. Let The Chemical Settle In
Leave it for an hour so the chemical can do its work, then start your motorcycle.
Step 5. Look For The Smoke From Exhaust
You’ll notice thick carbon residue ( smoke ) coming out of your motorcycle’s exhaust, it indicates that the seafoam/liquimoly 4t additive is working and clearing contaminants from the carburetor.
Step 6. Let It Idle Or Ride
Let the engine be running for 30 minutes either idling or riding at 40 to 60 MPH or 60 to 80 KHP. At the end of the ride, your motorcycle’s carburetor will be significantly cleaned.
Note : It only works for the motorcycles with low or moderate carburetor clog, if the clog is severe you will have to follow the first carb cleaner and compressed air gun method.
Now we look into major reasons why motorcycle carburetors clog.
What Are The Reasons For Motorcycle Carburetors To Clog
There are impurities in the fuel, which do not burn completely and leave their carbon deposits in the jets of the carburetor.
Also, the passageways of the carburetor get clogged with carbon, and grease over time.
The other reason is that fuel nowadays has around 10% of ethanol which gets hard over time (within weeks if the motorcycle is still)
this will eventually cause the carburetor to clog.
If you are planning to store the bike make sure that you add a fuel stabilizer to it.
That’s it, carbon deposits clogged in the jets and passageways over time from fuel residue and ethanol in the fuel are the simplest major reasons for the carburetor to clog.
If your looking for the right products which have high efficiency and quality and won’t mess up your motorcycle, we have curated an easy to pick list.
What Can You Use To Clean The Motorcycle Carburetor
You can buy a carburetor cleaner that is designed to clean the carburetor. Or the products like seafoam or liquimoly 4T shooter which are perfect, because they offer full fuel system cleanse also. Like removing carbon deposits from valves, spark plugs, combustion chamber, and the fuel system.
Carb cleaners irrespective of the brand works in the same way, so buy them from the reputed brand which has a good track record with their products.
But we have curated our picks for the carb cleaners and Fuel system cleaner ( liquid additive ), which you can add to your fuel tank to cleanse the whole fuel system.
Note : These products are used worldwide for excellent results and efficiency. We have used it time and time again along with many fellow riders all over the world because we want quality cause we love our motorcycles way too much.
Carburetor Cleaning Products
- WD-40 Specialist® Carb/Throttle Body & Parts Cleaner
- 3M Throttle Plate & Intake Cleaner
- Wurth Carburetor & Injector Cleaner
Liquid Additives ( Cleans Whole Fuel System )
- Sea Foam SF-16 Motor Treatment
- Liqui Moly Motorbike Fuel System Cleaner 4T Additive Shooter
On how to use these products, we have already explained a step-by-step process for carb cleaners and fuel system cleaners ( liquid additives that you add to the fuel tank ).
Now you will know why you should keep your motorcycle carburetor clean and what happens to the bike if you don’t.
Why You Should Keep Motorcycle Carburetor Clean
The carburetor is equipment in an Automobile equipped with an IC engine that mixes air and fuel for combustion in stoichiometric ratio/ideal ratio.
A carburetor can adjust the air and fuel ratio and produce a lean or rich mixture according to one’s needs.
The mixture of air and fluid goes into the combustion chamber via nozzles, and then ignition takes place.
The Following Are The Reasons For Keeping A Motorcycle Carburetor Clean
1. Fuel Efficiency
Fuel efficiency depends on how efficient the motorcycle/bike is being ridden.
If the carburetor is clogged, then the engine won’t be able to perform optimally.
The carburetor is supposed to send a mixture of fuel and air to the combustion chamber, it cannot do it efficiently if the jets & passageways of the carburetor are clogged.
Thus overall fuel efficiency will drop.
2. Misfiring
If the carburetor of the engine is been clogged, there would be a slight delay of multi seconds for the squirting of the fuel inside the
combustion chamber.
This delay will cause misfiring of the engine.
3. Engine Heating
A clogged carburetor sprays fuel inefficiently to the engine which leads to engine heating up, as the process of combustion will not be efficient.
The engine will not operate in its optimum way, resulting in inefficient cooling.
4. Acceleration
The engine needs to produce enough power for better acceleration. Power is generated when the combustion takes place inside the engine.
If the engine won’t be able to do combustion efficiently, the power output would drop drastically.
Resulting in an inefficient power supply leading to poor acceleration.
5. Cold Starting
When the carburetor is clogged it won’t be able to send a proper mixture of air and fuel to the engine.
If a proper mixture of air and fuel is not optimally sent to the engine then the ignition will be poor, resulting in the hard starting of the engine.
Now you know the reason why carburetors should be kept clean and how it affects the performance of the motorcycle. If you want to know how often the carburetor should be cleaned and its maintenance service, keep on reading we are at the end.
How Often Should You Clean The Carburetor & Its Maintenance Service
Cleaning the carburetor purely depends upon the usage of the motorcycle.
If the motorcycle is been used regularly the carburetor won’t need any maintenance because the fuel in the carburetor won’t be stagnant for a longer period.
Modern fuel consists of about 10% ethanol which will increase the octane level of the fuel but ethanol gets viscous ( Thick ) over time. This viscous ethanol will clog the motorcycle carburetor quickly.
So carburetor maintenance needs to be done more often if you keep your bike sitting for a longer period.
But we recommend getting your carburetor checked once in a year or every 6 months ( even though you don’t need it but for your inner peace and doubts ) or if you feel unnatural while riding.
Signs such as misfiring, lesser fuel economy, and poor acceleration will you an indication, so check if you see this pattern is prolonged.
Conclusion
Check your carburetor if you notice the signs we mentioned earlier. And try the step-by-step methods which we have also mentioned in this article for cleaning the carburetor if you are not in the mood for completely removing it.


