Table of Contents Show
Learning how to replace motorcycle clutch cable is an essential skill for any rider to ensure smooth gear shifting and optimal performance.
Replacing the clutch cable all by yourself will save you hundreds of dollars/pounds compared to what a mechanic would charge.
So today you will learn how to replace the clutch cable correctly on your motorcycle.
Adjusting the right amount of tension/free play at the clutch lever and clutch actuator arm are crucial factors when replacing the clutch cable.
Proper maintenance and timely lubrication are sure ways to ensure clutch cable longevity.
Here is a step-by-step procedure on how to replace the motorcycle clutch cable properly without any issues such as bad cable adjustment or poor cable routing.
Step 1: Gather the Necessary Tools
Before starting, you need to ensure that you have all the tools required for the job.
The tools required to easily replace the clutch cable on your motorcycle with any technical problems are listed below.
- Standard Wrench or Allen Wrench (8mm-12mm)
- Ratchet Tool (8mm-12mm)
- Screwdrivers
- Pliers
- Lubricant
Supersport motorcycles have fairings that need to be removed to access the clutch cable routing path.
So tools like Allen wrench, ratchet tool, or screwdrivers are required depending upon the type of screws or bolt used in your motorcycle’s fairing.
Step 2: Locate the Clutch Cable Routing Path
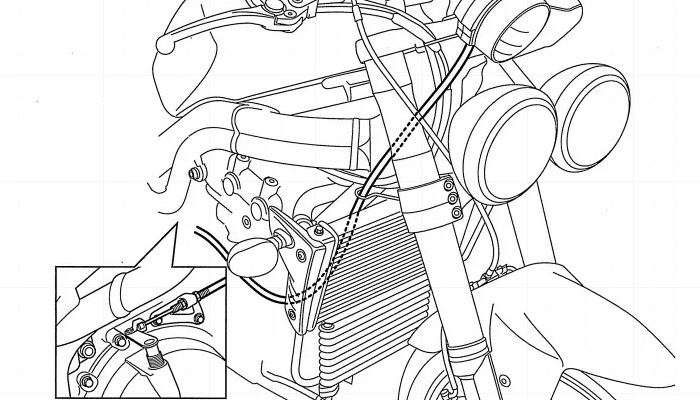
The way clutch cables are routed will depend on the type of motorcycle you have. Generally, clutch cables on naked bikes, dirt bikes & cruisers are easier to locate and are clearly visible.
So if you have a sports bike or adventure motorcycle, it is ideal to remove the fairings or certain parts beforehand to make the clutch cable process easier.
Take a picture or memorize the routing path of the clutch cable to avoid excessive kinks or bends while installing the new clutch cable.
You can use an Allen wrench or ratchet tool to remove the nuts/bolts from the fairing.
Step 3: Loosen The Clutch Cable Adjustment
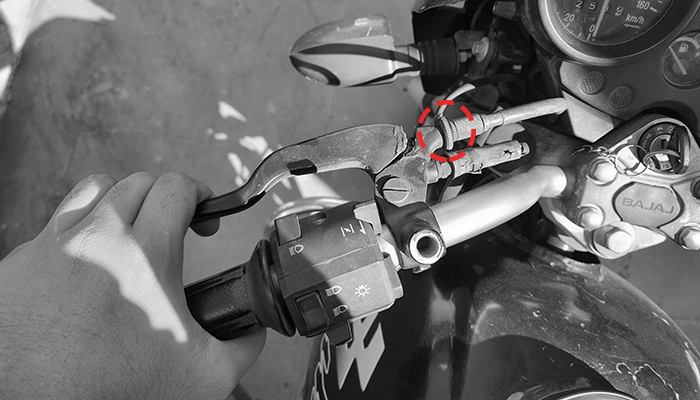
Loosen the clutch cable adjuster near the lever and the lock nut at the bottom of the clutch cable near the actuator arm.
You can use a wrench to loosen the nut near the clutch actuator arm.
Loosening the lock nut and cable adjuster will provide the necessary slack to remove all the tension from the clutch cable.
Releasing the tension from the cable will help you remove the clutch cable quickly and easily.
Step 4: Remove The Old Clutch Cable
Firstly, align the clutch cable with the cable adjuster’s open space/channel near the clutch lever.
Then lift the cable slightly to remove the clutch cable from the clutch lever, which will detach the clutch cable nipple end from the lever.
Follow the cable down to the engine near the clutch cover. Now detach the other end of the clutch cable by taking out the nipple end of the cable from the clutch actuator arm.
Now you can pull out the clutch cable upwards or downwards depending upon which way makes you feel easier.
Sometimes the clutch cable is held on the frame by zip-ties which need to be removed.
Step 5: Install The New Clutch Cable
Insert the new clutch cable by referencing the old clutch cable’s routing path from the pictures taken earlier.
The clutch cable should be routed in a downward sweeping motion with no sharp bends as it would cause friction.
If the new clutch cable you bought is unlined, then remember to lube it before installing. Though PTFE line clutch cables need zero lubrication, a little lube for added security measures is always welcomed.
Step 6: Connect Both Ends Of the Clutch Cable
Now connect the top end of the new clutch cable by inserting the nipple end of the cable into the clutch lever.
Insert the bottom end of the clutch cable’s nipple end into the clutch actuator arm.
Tighten the actuator arm lock nuts to secure the clutch cable firmly in place.
Step 7: Adjust the Clutch Cable Tension

It is recommended and ideal to have 2-4mm of clutch lever free play before it starts to engage.
So roll the clutch cable adjustment screw/bolt to achieve the idle cable tension.
This way the engagement and disengagement of the clutch will be optimal. It will avoid clutch issues like slipping or dragging of the clutch.
So adjusting the clutch cable with proper clutch lever free play will give enough slack to the clutch cable to avoid cable stretching.
Step 8: Test Ride With The New Clutch Cable
Take your motorcycle out for a test ride and check how the clutch is working. Make sure the clutch engages and disengages properly.
Go through every gear to see if the adjustments to the clutch cable are working properly or not.
Step 9: Final Adjustment
If necessary, make any final adjustments to the cable tension to ensure optimal clutch performance.
Don’t forget to tighten the lock nut at the bottom end of the clutch cable to achieve the right clutch cable adjustment.
But make sure the free play of the clutch lever should stay between 2-4mm.
Step 10: Secure The Clutch Cable Adjustments
Once you’re satisfied with the adjustments, make sure all nuts & bolts are secured and tightened to prevent any issues while riding.
So following this step-by-step process on how to replace a motorcycle clutch cable will help you save a lot of money.
Go through each step carefully to achieve ideal clutch cable tension and clutch lever free play.
DIY Clutch Cable Replacement Cost?
Replacing the clutch cable on your motorcycle by yourself will only cost around 10$-50$ (USD). Since the cost only accounts for the new clutch cable with no service or mechanic charges.
You can get a high-quality OEM clutch cable for your motorcycle or from a highly reputed brand like Motionpro or Venhill.
Signs Of A Failing Clutch Cable
Here are some early signs of a failing clutch cable that will let you know your motorcycle needs a clutch cable replacement.
1. Difficulty In Shifting Gears
Consistent miss-shifts of gear or delays in gear shift indicate that the clutch cable might have poor adjustment.
This can happen due to excessive cable stretch over time or poor clutch cable slack.
2. The Clutch Lever Feels Loose Or Spongy
Damage to the clutch cable nipple end or the clutch wire attached to the nipple end can cause loose or spongy clutch lever feel.
Any section of the clutch cable where it is damaged will also make the lever feel spongy and unresponsive.
3. Visible Fraying Or Damage To The Cable
Fraying of the clutch cable can happen on any section of the cable. Parts of the clutch cable where it’s severely bent could be damaged.
Visible fraying of the clutch cable can easily be spotted. Removing the outermost conduit/layer of the cable will expose any signs of damage to the cable.
4. Clutch Slipping Or Clutch Drag
Issues such as a clutch slip or clutch drag can occur if the clutch cable is physically damaged.
But make sure the clutch cable tension and clutch lever free play are properly adjusted in the first place.
Conclusion
So applying the proper clutch lever free play, cable tension, and following the steps mentioned in this guide will help replace the clutch cable for your motorcycle all by yourself.